17 October 2012

Chocolate Minicakes (chiffon method)

I was in the mood for chocolate.

 
Chocolate with something else.
But I couldn't decide on that 'something else'. 
So I made them all!

Chocolate cake with Ferrero Rocher.
Chocolate cake with almonds.
Chocolate cake with chocolate chips.


This time round, I decided to try my usual cupcake recipe with a twist.
Instead of the usual creaming method, I made these using the chiffon or egg separation method.

The result: a lighter fluffier cake but a little drier.
I reckon it's the meringue.

I can't say if this yielded a better result or not. It's really a matter of personal taste. If you like lighter cakes, this is the way to go; but if you favour denser, richer, moister cakes, then the creaming method would be your choice.


CHOCOLATE CAKE (chiffon method)
Makes 8 regular sized cupcakes.

50g chocolate, plus milk to make 1/2 cup or 120ml volume
2 egg whites
1/4 tsp cream of tartar (optional)
30g sugar
80g butter
70g sugar
2 egg yolks
1 tsp vanilla extract
120g plain flour
10g cocoa powder
1 tsp baking powder

In a glass measuring cup, measure 50g of chocolate.
Then pour in milk till it reaches the 1/2 cup or 120ml mark.
Microwave the mixture, stirring frequently, till the chocolate is melted and thoroughly mixed with the milk.
Set aside to cool.

Combine egg whites, cream of tartar and 30g sugar in a mixing bowl.
Whisk till soft peaks form.
Set aside.

In another mixing bowl, cream butter and sugar till light and fluffy.
Add egg yolks one at a time till well combined.
Add vanilla extract.
Add cooled chocolate milk mixture and mix well. 

Sift together flour, cocoa powder and baking powder.
Add to batter and mix on low till just combined.
Add the meringue and mix on low till just combined.
Or for an even lighter cake, fold in the meringue using a spatula or balloon whisk.

The batter is now ready for the cupcake liners.
For the Rocher cake, fill cupcake liner 3/4, then place a Rocher on top.
For the almond cake, sprinkle some sliced almonds on top.
For the triple choc chip cake, stir some choc chips into the batter, then fill the cupcake liner. Sprinkle top with more choc chips!

Bake at 150*C for about 25 mins.
Best served warm.
Or better still, with a scoop of vanilla ice cream :)

Enjoy!

* * * * * * *

More cake recipes can be found HERE.


15 September 2012

Mini Strawberry Cheesecake

I used to dread making cheesecake.
Only because it would take 60-90 minutes in the oven!!
(That's way too long for an impatient person like me.)


But then I realised that if I made minis, it would take just 20 minutes!!
And it eliminated the need for messy slicing.
And they're much cuter :)
And I get to use my hoard of cupcake liners.
What's not good about mini cheesecakes??


MINI STRAWBERRY CHEESECAKES
Makes 10 minis.

Crust:
180g Digestive biscuits, crushed
50g butter, melted

Stir melted butter into crushed biscuits till even combined.
Equally divide among the cupcake liners.
Press into the base of the cupcake liners.
Set aside while you prepare the filling.

Filling:
375g cream cheese
80g sugar (or more if you like it sweeter)
2 eggs
2 tbs milk
1 tsp vanilla extract

Allow the cream cheese to soften till it reaches room temperature. If you use cream cheese that's still cold, there's a high risk of curdling, and that won't make nice cheesecake.

With the paddle attachment, cream the cheese and sugar till evenly blended.
Add eggs one at a time, allowing each addition to combine completely before adding the next.
Add milk and vanilla extract till thoroughly combined.

Divide mixture equally among cupcake liners.
It's ok to fill the liners almost to the brim, as these don't rise much in the oven.
Bake at 140*C in a water bath for 20 min.

Chill the cakes in the fridge after they cool down to room temperature.
Best to make these a day in advance to let the flavours mature.
Just before serving, spoon 1 tsp of strawberry jam onto the top of the cake and top with half a strawberry.

Or simply enjoy it plain!


Click HERE for more cheesecake recipes.


10 September 2012

Hawaiian & Portobello Pizza


Why wait an hour for pizza delivery when you can make your own in the same time with fresh pizza dough and as much topping as you like?
Plus, I guarantee it's cheaper and more delicious!

Don't believe me?
Then give this a try and tell me your verdict.


PIZZA DOUGH
Makes a 12x12" pizza.

150ml warm water
1/2 tsp sugar

1/2 tsp sea salt
1-1/4 tsp instant yeast

3 tbs extra virgin olive oil
225g bread flour

Stir sugar and salt into warm water to dissolve.
Sprinkle yeast over water and set aside for about 10 min to activate the yeast.

Add olive oil and flour. Stir till dough comes together. 
Then knead till smooth and springy.

Place ball of dough in a large flour-dusted bowl. 

Proof for about 30 min till double in size.

Punch dough down. Rest 5 min.
Flour the dough ball generously, then press evenly into a greased 12x12" pan.


Spread pizza sauce on top of the dough. (I took a short cut today and just used pasta sauce from a jar.) Sprinkle generously with oregano and some freshly cracked black pepper.

Then layer on your favourite toppings.
For Hawaiian: ham and pineapple cubes (I used canned pineapples, drained and rinsed) 
For Portobello: bacon and portobello mushrooms, sliced

Finally, sprinkle with mozarella cheese. 

Bake in a 200*C oven for about 20 min.  

Best enjoyed when still warm!


More pizza ideas: 


24 August 2012

Lemon Coconut Cupcakes

I've been really busy with so many things lately - work, chores, errands, other hobbies, salsa classes, family, friends, home improvement projects...
Goodness, and I don't even have kids yet!  How do those working moms do it??


So, this is gonna be a real quick post to share with you a new recipe I tried recently. I was looking for cream cheese frosting recipes and chanced upon one that used whipped cream instead of butter!


Now, doesn't that sound nice?  No butter :) 

But before I dive into the recipe, I just wanted to digress for a moment so I can abuse this blog and brag a bit about the cushion covers I designed myself and just finished knitting :)


I bought the yarn on my New Zealand holiday 2 years ago. Yes, 2 long years! I have a (bad) habit of hoarding long lists of "To Do" projects. Please console me and tell me I'm not the only one with this terrible habit?

Alright, ok, my 5 seconds of bragging is over. Now back to the recipe...


LEMON COCONUT CUPCAKES
Makes about 20 mini cupcakes.

80g butter
95g sugar
2 eggs
1 tsp vanilla extract
1 tsp lemon extract
1 tbs lemon juice
100ml milk
130g plain flour
1 tsp baking powder, sifted with flour
60g grated coconut

Cream butter and sugar till pale and fluffy.
Gradually add eggs and extracts, and mix till thoroughly combined.
Add lemon juice and milk and mix well.
Mix in flour and baking powder on low speed till just combined.
Then fold in grated coconut till evenly distributed.
Fill baking cups till about 80% full.
Bake at 150*C for 15-18 min till done.
Cool completely before frosting.


CREAM CHEESE WHIPPED CREAM FROSTING
Makes more than enough for 20 mini cupcakes.

100g cream cheese, softened
80g caster sugar (more or less according to preference)
1 tsp vanilla extract
1/4 tsp lemon extract (optional)
yellow food colouring (optional)
180ml whipping cream

Combine cream cheese, half of the sugar, extracts and colouring.
Whisk or cream until smooth. Set aside.

In another bowl, whisk whipping cream and the remaining half sugar until stiff peaks form.

Gently fold whipped cream into cream cheese till evenly combined.
Transfer to a piping bag attached with your preferred piping tip and decorate your cupcakes!  


Note: 
The frosting was a little weepy in the hot and humid climate I live in. So next time, I'll try adding a little gelatin into the frosting to see if it'll help stabilise the frosting. Will post the results when I try this again. 


These little cuppies were made specially for a gathering with a group of fellow baking enthusiasts who were such fun company and so generous (aka way too much food). Hope you ladies and gents enjoyed it :)

I may not have time to post the food porn from the gathering, but I don't want you to miss out on the titillating images, so please head over to their blogs to check out the X-rated photos  :)

Passionate About Baking - Grilled Vege Frittata, Creamy Prawn & Mushroom Canapes
Dreamersloft - Lemon Meringue Cupcakes
Precious Moments - Banana Sherbet, Coffee Ice Cream

Peng's Kitchen - Cherry Cake
All That Matters - Puff Biscuits, Chicken Stew
Honey Bee Sweets - Chicken Kebabs
Travelling Foodies - Ikan Gerang Assam, Durian Apam Balik, Macaron Roselle
@kokken - Ngoh Hiang
Wen's Delight - Korean Rice Rolls
Baking Library - Chicken Pies
I Love. I Cook. I Bake. - Steamed Pandan Brownies, Chocolate Pudding
Annielicious Food - Tiramisu


07 July 2012

Chiffon Cheesecake with Hershey's Syrup Swirls

It's been a long time since I had chiffon cheesecake, better known as Japanese cheesecake to some. Many of you would already be familiar with this, so it needs no introduction.


For a little bit of fun, I added some Hershey's Syrup into some batter and marbled it on the top. While the visual effect was quite nice, I didn't quite taste enough Hershey's. More next time!!!


CHIFFON CHEESECAKE 
with Hershey's Syrup Swirls
Makes a 6x9" cake.

20g butter
115g cream cheese
45ml milk
3 egg yolks
1/2 tbs vanilla extract
1/2 tbs lemon juice
30g cake or plain flour
10g corn flour
3 egg whites
1/4 tsp cream of tartar
65g caster sugar
60ml Hershey's syrup

Melt butter, cheese and milk over a water bath. (Or just stick it in the microwave in 10-second shots, stirring in between till you get a smooth mixture.)
Set aside to cool.

Add egg yolks, vanilla extract and lemon juice and stir till well combined.
Combine the flours, then sift it into the mixture and stir till well combined. 

In a clean mixing bowl, combine egg whites, cream of tartar and sugar.
Whisk till soft peaks form.

Pour egg whites into cheese mixture and fold gently (preferably with a balloon whisk) till no whites streaks are visible.

Pour batter into a greased and lined baking tin, saving just about 1/2 cup (120ml) of batter. Add Hershey's syrup into the remaining batter and stir gently will well combined. Randomly dot the top with the Hershey's mixture, then use a chopstick to create swirls.

Bake at 160*C in a water bath for 45-50 min till a toothpick inserted comes out clean and the top has browned nicely.

Best to slice the cake when chilled so that there are less crumbs.


03 July 2012

Mini Oreo Cupcakes

I've been wanting to bake Oreo cupcakes for a while. And I finally got down to it some weeks ago.

You can use any Oreo flavour you like, but I think the classic flavour is still the best :)


You may not be able to tell from the pictures, but these are really small and cute! Each cupcake is only about 3cm in diameter. They're just too cute!! (If you're wondering, these cupcake liners are from Phoon Huat. Look for item code 13189.)


OREO CUPCAKES
Makes about 20 mini cupcakes.

80g butter
90g sugar
2 eggs
1 tsp vanilla extract
100ml whipping cream
130g plain flour
5g cocoa powder
1 tsp baking powder
4 Oreos, filling scraped off and set aside, biscuits crushed


Sift together flour, cocoa powder and baking powder. Set aside. 
Beat butter and sugar till fluffy.
Add Oreo filling, eggs and vanilla extract and beat till well combined.
Add whipping cream and beat till well combined.
Add flour mixture and briefly beat till just combined.
Gently fold in crushed Oreos. (The Oreos can be roughly smashed into chunky bits, which will give a nice texture to the cupcake. But if you prefer a more refined texture, then finely crush them.)

Spoon into paper liners and bake at 160*C for 12-15 min. (Regular sized cupcakes will take 15-20 min.)
Cool completely before frosting.


For the frosting, I used Swiss Meringue Buttercream. Recipe can be found here

For the toppings, I used crushed Oreos, desiccated coconut, chocolate rice and rainbow sprinkles.


27 June 2012

Tiramisu, the batter baker way

I promise you, this tastes a lot better than it looks.
My photography skills are horrible (thankfully my food-making skills are a little better), so do give this recipe a chance.


I absolutely love love love tiramisu - the soft moist cake with layers of melt-in-your-mouth mascarpone is just heaven in a bite!

Well, actually, you don't even have to bite. This tiramisu just melts in your mouth! 

When I tasted my first tiramisu (at the grand old age of 17 - oops, underaged alcohol consumption... shhh), I had the impression that it would be difficult to make, just because it was such a delicious dessert.  So when I was told it was super easy and didn't even require baking, I was thrilled!!

After trying out a few recipes, I've finally come up with my own variation. It's largely based on Giada de Laurentiis' recipe, but with a small but significant tweak, that made all the difference to me.


TIRAMISU, the batter baker way
Makes a 6x6" cake.

Sponge layers:
1 pack instant coffee
1 tsp cocoa powder
180ml hot water
1 tbs dark rum (or you can use kahlua or bailey's)
18 pcs savaiordi (sponge fingers)

Mascarpone layers:
3 egg whites
2 tbs caster sugar
1/4 tsp cream of tartar
250g mascarpone cheese
3 egg yolks
2 tbs caster sugar 

cocoa powder
chocolate curls


Combine all the ingredients for the sponge layers (except the fingers).  Set aside to cool while you prepare the mascarpone mixture.

Combine egg whites, sugar and cream of tartar in a clean oil-free bowl.
Whisk till peaks are stiff. Set aside.

In another bowl, combine cheese, egg yolks and sugar.
Mix till well combined and creamy.
Fold meringue (stiff egg whites) into the cheese mixture till well combined.

To assemble the tiramisu, dip a sponge finger for just 1 second into the coffee mixture. Place in your serving dish and repeat till you get a single layer of sponge fingers.

Scoop half of the cheese mixture onto the sponge fingers and spread evenly.
Sprinkle with cocoa powder, as much as you like.

Repeat with sponge fingers, cheese mixture and cocoa powder.
Finally, scatter chocolate curls on top and lightly press into the cheese.
Refrigerate for at least 4 hours before serving.


Hope you like this variation of tiramisu. 
Give it a try and let me know what you think!


* * * * * * *


22 June 2012

Avocado Ice Pops

Maybe you love avocado.
Or maybe you loathe avocado. 

It's an acquired taste. 
Like cheese. (I love!) 
And durian. (I loathe.) 


For avo-lovers, here's a cool recipe for you. (No pun intended.)


AVOCADO ICE POPS
Makes 4 creamy ice pops.

1-1/2 avocados
2-3 tbs gula melaka, melted (or use honey if you don't have gula melaka)
water
1-2 tbs lime or lemon juice (optional)

Place avocado (skin and seed removed, of course), gula melaka and lime juice into a measuring cup.

Add water till it reaches the 480ml mark. (If you're wondering, I used popsicle moulds from Daiso. Adjust recipe according to your mould. Proportion doesn't have to be precise. Use more avocado if you're a die-hard avo fan or for a creamier ice pop.)

Transfer everything into a blender and blitz away till smooth. (I like my ice pops smooth and creamy. But if you like some chucky avo bits in your pops, stop blitzing when the mixture is to your liking.)

Pour into popsicle moulds and freeze for at least 4 hours or till set.


* * * * *

Now that you've made your avo-pops, what are you gonna do with the remaining half avocado??

Make a tunavomato sandwich!!

A what??

A tuna-avocado-tomato sandwich.
Yup! I like to call it a tunavomato sandwich  :)
It's the best breakfast sandwich ever!  Trust me. 


12 May 2012

Banana Chocolate Chip Minicakes

Did you know that you could freeze bananas?  
Yes, indeed you can. 
You may not want to eat it plain once it's thawed out, but it's perfectly fine for smoothies and cakes. After all, the bananas will be all mashed up. 

So the next time you have over-ripe bananas at home, don't throw them out! Save them in the freezer for a yummy, healthy bake!


BANANA CHOCOLATE CHIP MINICAKES
Makes about 8 minicakes.

1 egg
20g brown sugar + 40g white sugar  (or just 60g white sugar)
2 tbs maple syrup (optional)
1 tsp vanilla extract
80ml oil 
200g mashed bananas (about 2 med sized bananas) 
125g flour
1/4 tsp baking powder
1/2 tsp baking soda
30g chocolate chips, more or less as you desire

Beat egg and sugars till light and creamy.
Add maple syrup, vanilla extract, oil and mashed bananas and beat till well combined.
In a separate bowl, sift flour, baking powder and baking soda, and give a quick whisk. 
Fold in flours and chocolate chips into the wet ingredients until no traces of flour remain. 

Spoon into cupcake liners.
Bake at 160*C for 18-20 min till done. 
Enjoy warm! 


06 May 2012

Wholemeal Flax Seed Bread

I'm so thrilled that I've finally found an idiot-proof bread recipe.
The best part of this recipe is that it takes only about 2.5 hours from start to finish. Certainly do-able for a weekday night.


This recipe is so versatile.
You can make plain white bread, wholemeal bread, fruit and nut bread, dinner rolls, sardine buns, tuna buns, cheese buns... you get the idea.
It's super soft, fluffy and moist and so tasty that it's good enough to eat on its own!

This is gonna be my holy grail go-to recipe for bread from now on.
Just look at that crumb!!


WHOLEMEAL FLAX SEED BREAD

125g milk, lukewarm
35g Sugar 
1.5 tsp instant yeast 
10g milk powder 
260g flour (use any combination of flour you desire; for this recipe, I used 40g wholemeal flour, 20g flax seed, 100g plain flour, 100g bread flour)
1/2 tsp Salt
1 egg
60g unsalted butter, softened

Combine all ingredients in a mixing bowl. 

Using the hook attachment, run your mixer for about 15 min till you get a smooth tacky dough. 
Cover with a damp tea towel and proof for 45 mins. 

Punch dough down. Let it rest for about 10 min. 

Shape the dough into a log to fit a 8x4" loaf pan. 
Grease the loaf pan before placing the dough in it. 
Let it proof for another 45 mins.


Bake at 200*C for 30-35 mins, tenting till the last 2 min of baking.  
Remove from pan and cool on a wire rack. 
Slice only when bread has completely cooled. 


29 April 2012

Mini Cheesecakes

I have a soft spot for anything mini.


Minis are just so pretty and dainty.
(Just like me! hehe)


Ok, serious now. 


There's nothing special to making minis.
The recipe doesn't change.
Ok, well, maybe the baking time changes, but that's about it.

For these minis, I used the same recipe as my Rum & Raisin Cheesecake, except that I left out the rum and raisins, and reduced baking time to just 20 min.
(Recipe makes about 20 mini cheesecakes in large cupcake liners about 2.5" diameter.)


28 April 2012

Cheese-less Crust-less Quiche

What? No cheese? No crust? Can you even call that a quiche?


First, let me tell you why it's crust-less...
I was simply too lazy to make pastry dough. (I'm sure many of you out there are guilty of this too. Right?)  So I pulled out some tortilla wraps from my freezer, searched my drawers for a suitable sized bowl, and delicately pressed one wrap into each bowl.


Now, why is it cheese-less?
Because I plain forgot. Yes. Forgot. Silly reason, but I'm sure it happens to all of us as some point.

Nevertheless, despite the laziness and the boo-boo, it still turned out ok.
Quite pretty in fact, if I may say so  :)  And certainly less sinful than a traditional buttery crust.


TOMATO BACON BROCCOLI QUICHE
Serves 2.

2 tortilla wraps
A handful of cherry tomatoes
3 rashes of bacon, sliced into 1cm strips
Some broccoli, chopped to small pieces
1/2 tsp dried basil
150ml milk
2 eggs

Press tortilla wrap into a greased oven-proof bowl.
Slice tomatoes in half and scatter onto wrap.
Cook bacon in a pan for about 5 min, then add the broccoli and cook for another 5 min till broccoli has softened slightly.
Scatter on top of tomatoes and sprinkle the basil over the top.


Combine milk and eggs, then pour on top of filling.
Sprinkle with pepper and parsley flakes if desired.


Bake at 170*C for 25 min.
Carefully remove from bowl and cool on a wire rack for about 5 min.
Serve while still warm to hungry tummies, in the hope that they won't realise that the dish is missing some cheese.


15 April 2012

Maple Cinnamon Rolls

I wish there was a way to multiply the time we have in a day.
There are just so many things to do but so little time.

As I've resolved not to get lazy and neglect my blog, I thought I should at least post the recipe for those of you who might find it useful.

The photo really doesn't do justice to the rolls (I used my iphone to take this shot).  And don't be fooled - the rolls are mini size, less than 2 inches each. Somehow, minis seem less guilty than regular size ones :)


Maple Cinnamon Rolls 
Makes 32 mini rolls (using two 8" pans).


320ml milk, lukewarm
80ml oil
50g sugar
1.5 tsp instant yeast
350g + 40g plain or bread flour 

1/2 tsp baking powder
1/3 tsp baking soda
1 tsp salt
100g butter, room temperature
100g brown sugar
2 tbs cinnamon powder
1/4 - 1/2 cup raisins, according to preference
maple syrup, for drizzling 

Combine milk, oil, sugar, yeast, and 350g flour. 
Knead with dough hook for about 10 min. 
Cover and let rise for at least 1 hour. 

Combine 40g flour, baking powder, baking soda and salt. 
Add to batter and knead till fully incorporated.  
The dough will be rather sticky; don't worry. Chill the dough in the fridge for a few hours (up to 2 days). This will firm up the dough. If it starts to overflow, punch it down.   

Dust your work surface generously with flour. 
Roll the dough out thinly into a rectangle.  
Spread the butter over the dough. 
Combine brown sugar and cinnamon, then spread evenly over dough. 
Distribute raisins evenly. 

Tightly roll the dough into a log, pinching the seams to seal the edge.  
Cut the roll into 16 equal pieces and place them in a greased baking tray. 
Leave some space between the rolls to allow for expansion. 

Cover and let the rolls rise for 20-30 min or till they fill up the pan. Bake at 180*C for 20-25 min till golden brown. 
While still hot, drizzle maple syrup over the rolls.


Best served warm, with a cup of coffee or tea.

14 April 2012

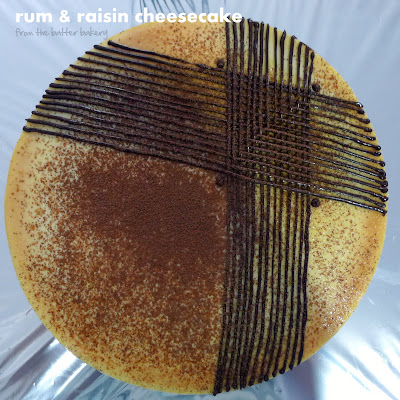
Rum & Raisin Cheesecake

Who likes Rum & Raisin?

Whoever thought of this flavour combination is a genius!!


This is a great way to jazz up a classic cheesecake.
See the little raisins peeking out the side of the cake? 
Now, if there was rum & raisin cheesecake ice cream.... 


You can basically take your favourite cheesecake recipe and just add rum & raisins.
But to give this cake maximum flavour, soak the raisins in rum at least 3 days in advance.

RUM & RAISIN CHEESECAKE

Makes an 8- or 9-inch cake.

CRUST: 
200g Digestive biscuits, finely crushed
100g unsalted butter, melted

Mix crushed biscuits and melted butter till well combined.
Press evenly into springform pan. (If you are not using a non-stick pan, grease the sides of the pan.)
Cover and refrigerate while you make the filling.

FILLING:
1kg cream cheese, softened
200g white sugar
30g flour
5 eggs
80ml whipping cream or sour cream
1 tsp vanilla extract
2 tsp lemon juice (optional)
80g raisins, soaked in 80ml dark rum for at least 3 days

Beat together the cheese, sugar and flour with the paddle attachment on medium speed. 
Do not beat on high speed; you just want to combine the mixture, not introduce air, which would only cause cracks in your cheesecake.

Add eggs one at a time, ensuring that the batter is thoroughly mixed.
Add whipping cream, vanilla, lemon juice and the rum drained from the soaked raisins. Mix well. 
Gently fold in raisins.

Pour filling on top of crust.
Bake at 140*C for about 60 min or till edges are set but centre still looks a little wet and wobbly.
Many recipes will advise you to bake cheesecake in a water bath. But because I used a springform pan, I didn't want to take the risk and just placed a tray of hot water on the lower rack while baking. Alternatively, you can wrap a wet towel around the pan; this would have the same effect as a water bath.

When the cake looks done (wet and wobbly in the centre), turn off the oven and let the cake cool in the pan, in the oven with the door closed for at least the first 30 min or so. This very slow cooling process will ensure that there is no sudden temperature drop that would cause cracks in the cake. And because the oven is still warm, it will continue cooking the cake so that by the time it has cooled to room temperature, the centre of the cake would have been done just right.

When the cake has cooled to room temperature, cover with foil and refrigerate for at least 4 hours. I prefer to bake cheesecake at least a day in advance so that it has at least 24 hours for the flavours to mature and develop before eating. Trust me, freshly baked cheesecake does not taste as good as 'matured' cheesecake.

TOPPING:
handful of chocolate chips
1 tbs rum (or whipping cream)

Melt chocolate chips bain marie, gently stirring till smooth. 
Stir in rum.
Transfer to a piping, then snip a tiny bit off the end before piping any design you like.
Dust with cocoa powder if preferred. 


09 April 2012

Pink Cupcakes

Just for the fun of it, I thought I'd add some pink colouring to my cupcake batter.
I skipped the usual cupcake frosting as I personally don't fancy the sweet stuff. Instead, I topped the cuppies with an assortment of cornflakes, peanut butter, jam, and nutella.


I can't decide if I like it or not.
Seems odd biting into pink cake. Other than that, my favourite topping was the peanut butter and jam (the cupcake right in the middle.)
Would you eat pink cake?


Recipe can be found here.
The only difference is the addition of pink food colouring to the batter.

Tip:
The intensity of the colour faded after baking. So if you're making coloured cakes, you might want the batter to look one shade darker than your intended colour.


30 March 2012

Low-fat Yogurt Cupcakes

Don't you just love it when you see "low-fat" on a dessert? 
It makes us feel less guilty about taking a bite or two more out of that carb and sugar loaded piece of cake!  

Haha, every bit counts doesn't it?  So low-fat anything is better than low-fat nothing! 

So here you go, girls... 

LOW-FAT YOGURT CUPCAKES
Makes about 9 regular cupcakes.

80g butter 
100g sugar
2 eggs
1 tsp vanilla extract
150g (abt 1/2 cup) low-fat yogurt
130g plain flour
1 tsp baking powder, sifted with flour
 

Whip butter and sugar till pale and fluffy.
Add eggs and vanilla extract, and beat till well combined.
Add yogurt and mix till well combined.
Mix in flour and baking powder on low speed till just combined.
The batter should be soft dropping consistency. 


Divide batter equally among cupcake cases. Sprinkle desired toppings.

Bake at 160*C for about 20 min or till a toothpick inserted in the centre comes out clean. 


04 March 2012

Triple Chocolate Mousse Cake

It's been a long long long time since I last made a cake.
And the last time I made a Triple Chocolate Mousse Cake was in Dec 2010.

Since then, I've been wanting to try another variation of the Triple Chocolate Mousse Cake by America's Test Kitchen.

And again, their recipes have not failed me.
It was easy to make, almost fail-proof, and the flavours were great! Of course, it helps that you use the best quality chocolate you can afford, since this cake is all about the chocolate.


I was in such a haste to get this ready for a birthday party that I didn't have the chance to take photos of the sides or the insides (I wrapped this cake with plastic around the sides, that's why you see a shiny reflective surface in the photo).

But... to show you what it looks like inside, here's a shot from my 2010 attempt, and it pretty much looks the same.


The original recipe from the website was for a 9.5" cake. But I halved the recipe and it made a 6.5" cake just perfectly. You could probably make up to a 8" cake; you'll just get shorter layers and a shorter cake, but the flavour will be just as awesome!

Now, don't be put off by the long recipe for this cake. It's really not that complicated at all. The recipe is long only because the instructions are very detailed. Once you've read through the recipe, you'll find that it's really rather simple. I gave it a go, and am so glad I did. Cos this is a really lovely mousse cake - rich, yet light at the same time. It sounds odd, but it's true. You'll know what I mean when you try it...


TRIPLE CHOCOLATE MOUSSE CAKE
Makes a 6.5" to 8" cake, using a springform pan at least 3" high.

BOTTOM LAYER:
42g butter
100g bittersweet chocolate
3/8 tsp instant espresso or coffee powder (optional)
1 tsp vanilla extract
2 eggs, separated
pinch of salt
35g brown sugar

Melt butter, chocolate and espresso powder bain marie, stirring occasionally till smooth. Remove from heat and allow to cool slightly.
Whisk in vanilla extract and egg yolks. Then set aside.

Whisk egg whites and salt till frothy.
Gradually add sugar and whisk till soft peaks form.
Fold 1/3 of the egg whites into the chocolate mixture to loosen it up.
Then gently fold in the remaining egg whites till no white streaks remain.
Push the batter into a greased or lined springform pan, smoothing the top.
Bake at 160*C for about 15 min till cake is done.
Transfer to a wire rack to cool. Do not remove the cake from the pan.
The cake will collapse and shrink quite a bit as it cools. This is perfectly normal, so don't get worried.

MIDDLE LAYER:
1 tbs cocoa powder
2.5 tbs hot water
100g bittersweet chocolate
180ml whipping cream
1/2 tbs white sugar
pinch of salt

Combine cocoa powder and hot water. Set aside.
Melt chocolate till smooth. Then set aside to cool slightly.
Whisk whipping cream, sugar and salt till soft peaks form.
Whisk cocoa powder mixture into the melted chocolate till smooth.
Then fold together the whipped cream and chocolate mixture till no whites streaks remain.
Spoon the mousse over the cooled cake (bottom layer) and smooth the top.
Refrigerate for at least 15 min while preparing the top layer.

TOP LAYER:
3/8 tsp powdered gelatin
1/2 tbs water
85g white chocolate
180ml whipping cream

In a small bowl, sprinkle gelatin over water. Let stand for 5 min.
In a small saucepan, bring 60ml of the whipping cream to a simmer.
Remove from heat, add gelatin and stir till fully dissolved.
Add white chocolate and stir till smooth.
Let the mixture cool to room temperature, stirring occasionally.

Whisk the remaining whipping cream till soft peaks form.
Fold 1/3 of the whipping cream into the chocolate mixture to loosen it up.
Then fold in the remaining whipped cream till no white streaks remain.
Push the mousse into the pan over the middle layer, and smooth the top.
Refrigerate for at least 3 hours or overnight to allow the cake to set.

To serve:
I chose to decorate the cake with more chocolate.
First, I dusted some cocoa powder over the top in a triangle pattern.
Then I placed 3 Ferrero Rochers in a cluster near the edge of the cake.
Next, I sprinkled some chocolate shavings around the Rochers, lightly pressing them into the mousse.
Finally, I randomly pressed in a few silver dragees to add a little bling!


I hope you'll give this recipe a try, and if you do, please let me know how it goes for you.

Thanks for reading this very long post  :)


Valrhona Chocolate Brownies

I can't believe that two months have already passed since the new year. Where did all that time go??


There are so many new recipes that I'd like to try, but the list keeps growing faster than I can tick them off. 


As I scrolled down the list, I decided to pick a simple one - Alton Brown's Cocoa Brownies, made with cocoa powder rather than melted chocolate. Do any of you watch his show Good Eats? It's an unconventional and rather scientific way of presenting recipes; sometimes quirky. Some like it, some don't. I think it's all in good fun and there are always interesting things to learn. 


(Sorry for this lousy pic. Hubby took the camera, so I only had my Blackberry to take this photo.)


As with all American recipes, I always cut down on the sugar. So that was one change I made to the recipe.


Another change was to scale the recipe down by 25% to fit my 6x9 inch pan. 


Finally, the most important change - using Valrhona chocolate powder instead of normal cocoa powder. 


These brownies have a lighter, more cake-like texture due to the whisking of the eggs. So if you like the dense fudgy sort of brownies, this recipe is not for you. 


VALRHONA CHOCOLATE BROWNIES
Makes 6-8 portions in a 6x9" pan. 

  • 3 eggs
  • 100g white sugar
  • 120g brown sugar
  • 170g melted butter
  • 120g Valrhona chocolate powder, sifted
  • 2 tsp vanilla extract
  • 50g flour, sifted
  • 3/8 tsp salt
Butter and flour, or line with parchment paper, a 6x9 inch pan.
Whisk the eggs till fluffy and light yellow. Add both sugars and whisk till combined. Then add remaining ingredients, and mix to combine.
Pour the batter into baking pan and bake at 150*C for 45 minutes. Brownies are done when a toothpick inserted into the center of the pan comes out clean. Remove to a rack to cool. Resist the temptation to cut into it until it's mostly cool.


These brownies freeze well. Just heat them up in a microwave, and serve with vanilla ice cream, toasted almonds and Hershey syrup for a sweet treat!!


Hope you all enjoy this easy recipe!
Feel free to add nuts (walnuts are best) or marshmallows into the batter for a rocky road brownie.


Just remember to serve them warm - they somehow taste better :)